
Fixing Embedded Controller (SSDT-EC/USBX)
What this SSDT does
The purpose of SSDT-EC/USBX is a couple things:
- On desktops, the EC(or better known as the embedded controller) isn't compatible with AppleACPIEC driver, to get around this we disable this device when running macOS
- AppleBusPowerController will look for a device named
EC, so we will want to create a fake device for this kext to load onto- AppleBusPowerController also requires a USBX device to supply USB power properties for Skylake and newer, so we will bundle this device in with the EC fix
- On laptops, the EC is used for hotkeys and battery so disabling this isn't all too ideal. Problem is our EC's name isn't compatible, so we will create a simple "fake" EC device that will satisfy Apple
So TL;DR:
- EC is embedded controller
- Desktops will want real EC off, and a fake EC created
- Laptops will just want an additional fake EC present
- Skylake and newer devices will want USBX as well
Methods to make this SSDT
For the EC fix, there are 3 methods you can choose from:
Prebuilt
The main things to note with this method:
- Quite Bloated
- There's ACPI naming for every type, this means there's added delays in boot times
- Doesn't really teach you anything
- For most, this doesn't matter. But to some knowing what makes your hackintosh tick is part of the journey
By far the easiest way to fix your Embedded Controller is just downloading one of the files below:
Desktop
- SSDT-EC-USBX-DESKTOP
- For Skylake desktops and newer and AMD CPU based systems
- SSDT-EC-DESKTOP
- For Broadwell desktops and older
Laptops
- SSDT-EC-USBX-LAPTOP.aml
- For Skylake laptops and newer
- SSDT-EC-LAPTOP.aml
- For Broadwell laptops and older
SSDTTime
The second involves using SSDTTime which automates most of the process. See here on how to use it: SSDTs: Easy Way
To get the SSDT-EC on desktops, run the following:
7. Dump DSDTthen run2. FakeEC
To get the SSDT-EC on laptops, run the following:
7. Dump DSDTthen run3. FakeEC Laptop
This will provide you with some files, the main one you care about is SSDT-EC.aml. The DSDT and .dsl are only left for referencing or verification.
The main things to note with this method:
- Doesn't provide you the USBX property to fix power
- This can easily be fixed by using this prebuilt file in addition to SSDT-EC: SSDT-USBX.aml
- Note USBX is only needed for Skylake and newer
- Doesn't really teach you anything
- For most, this doesn't matter. But to some knowing what makes your hackintosh tick is part of the journey
Manual
TO-DO
- Finish Edge cases and sample SSDT edits
Finding the ACPI path
To find the ACPI pathing, you have 2 methods:
DSDT
Finding the ACPI pathing is quite easy actually, first open your decompiled DSDT you got from Dumping the DSDT and Decompiling and Compiling with either MaciASL(if in macOS) or any other text editor if in Windows or Linux(VSCode has an ACPI extension that can also help).
Next, search for PNP0C09. You should get something similar:
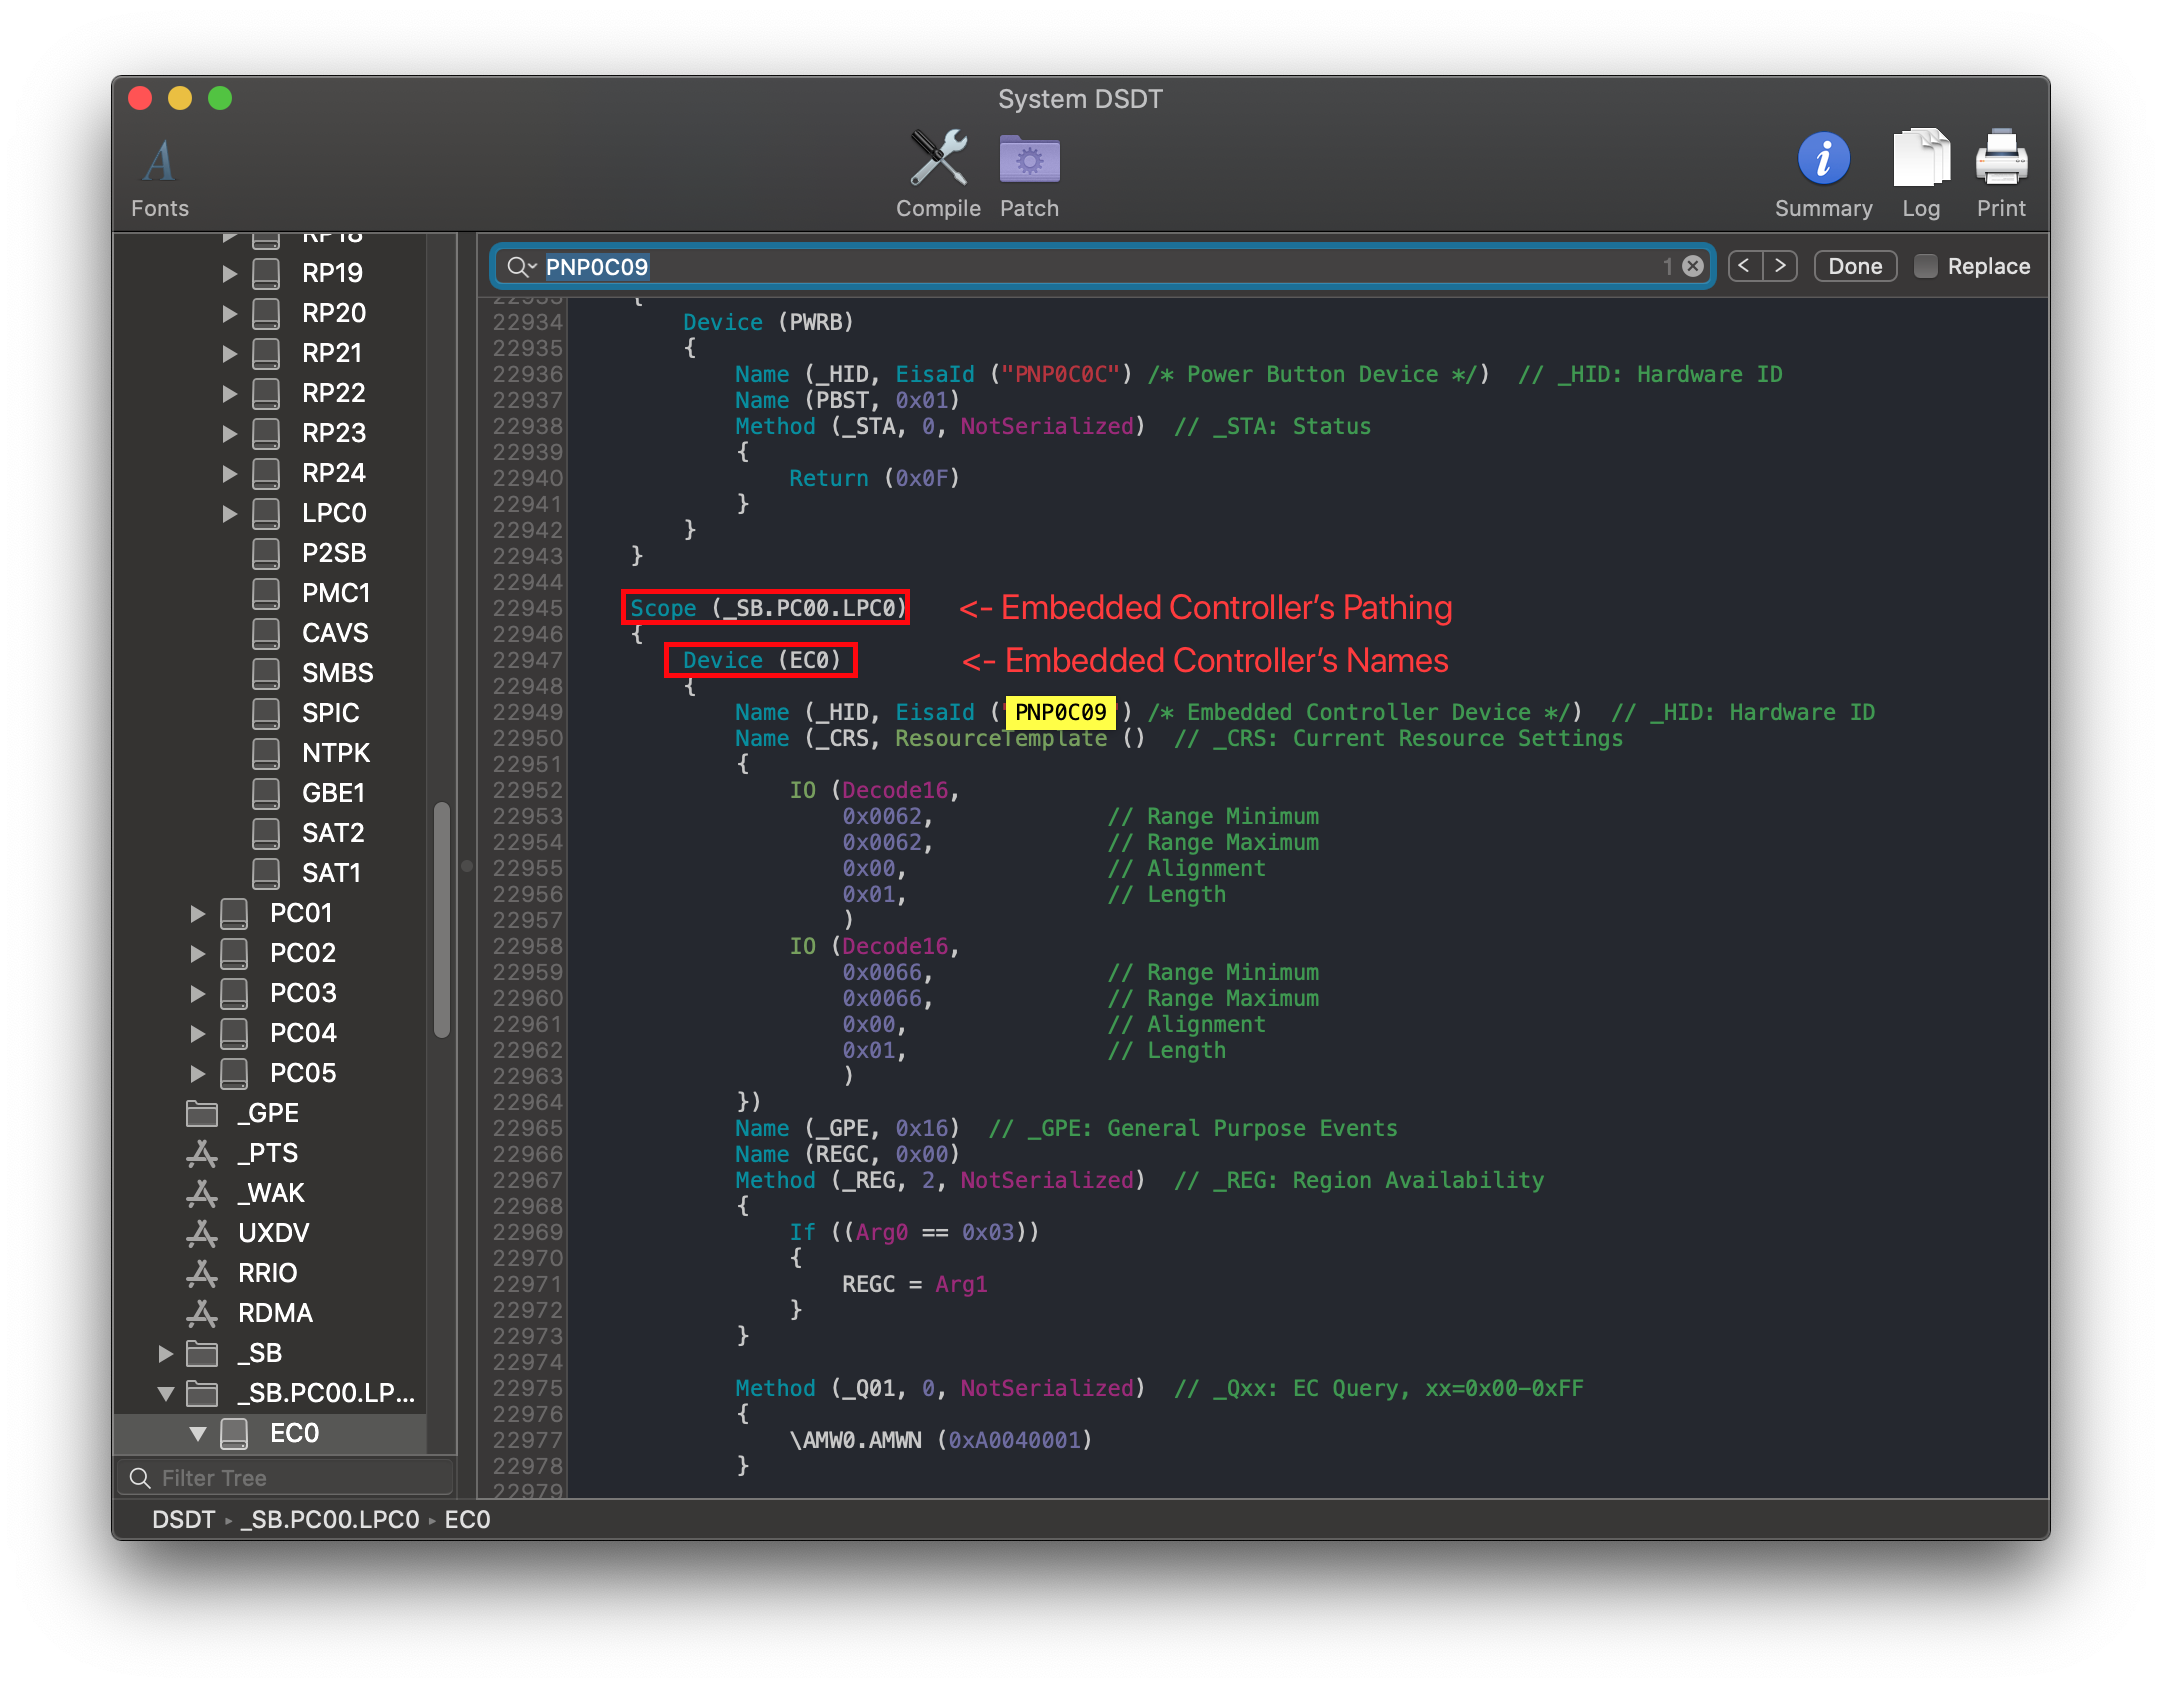
From the above example we see 2 main things:
- Name of our embedded controller
- In this case being
EC0
- In this case being
- Pathing of our embedded controller
PC00.LPC0
But now we get into edge case territory, what fun!
If none of the above apply to you, you're ready for the next section:
DeviceManager
If you already have Windows installed on this machine, finding the EC pathing is fairly easy.
Start by opening up Device Manager in Windows and looking for a device named Embedded Controller. Once found, click on it and select the BIOS device Name entry. You should get something like this:
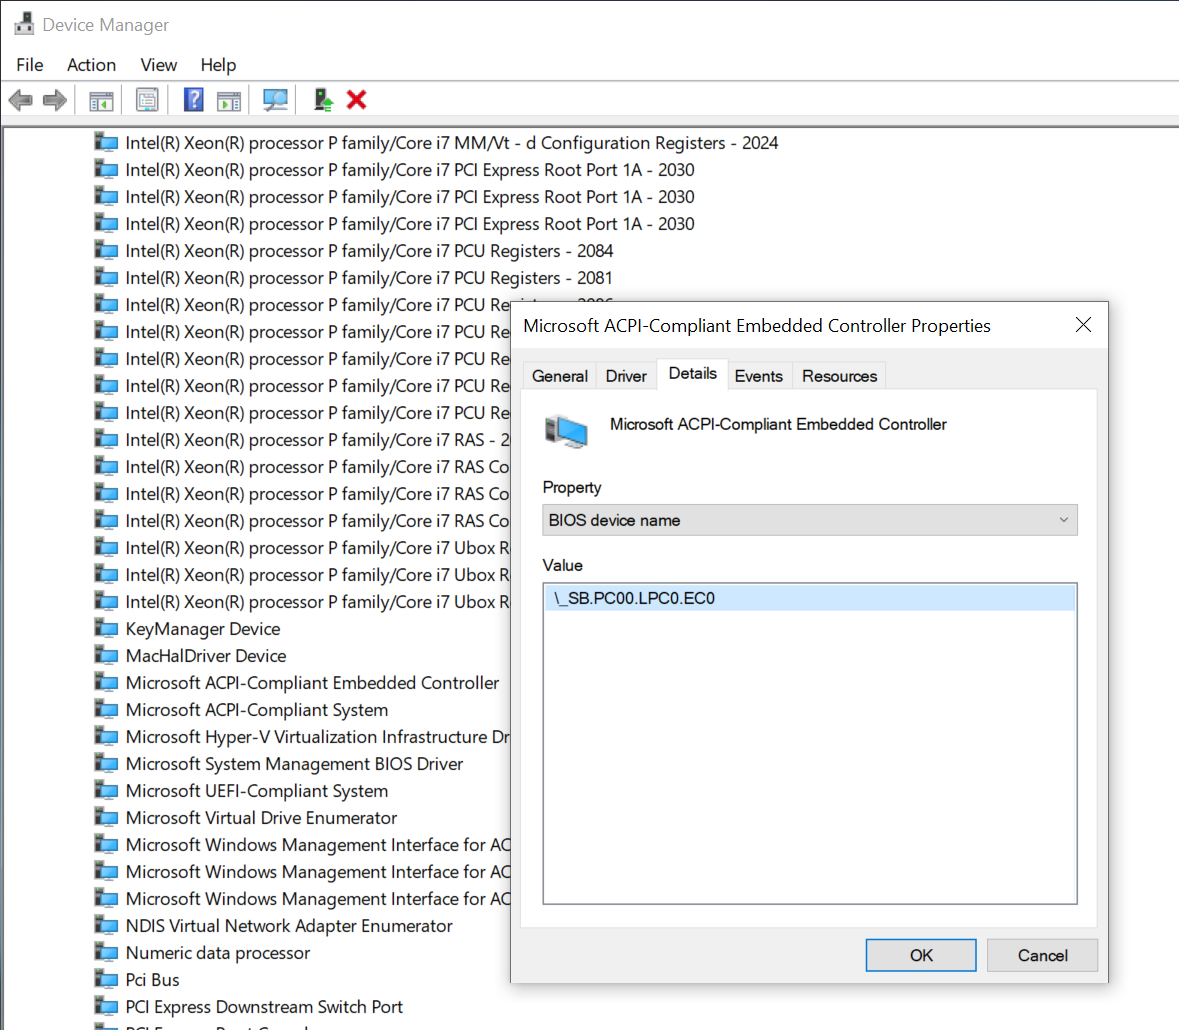
From the above, we can see that our pathing is SB.PC00.LPC0.EC0
Now with the pathing, you can head here: Edits to the sample SSDT
Edits to the sample SSDT
Now that we have our ACPI path, lets grab our SSDT and get to work:
- SSDT-EC-USBX
- For Skylake and newer and all AMD systems
- SSDT-EC
- For Broadwell and older
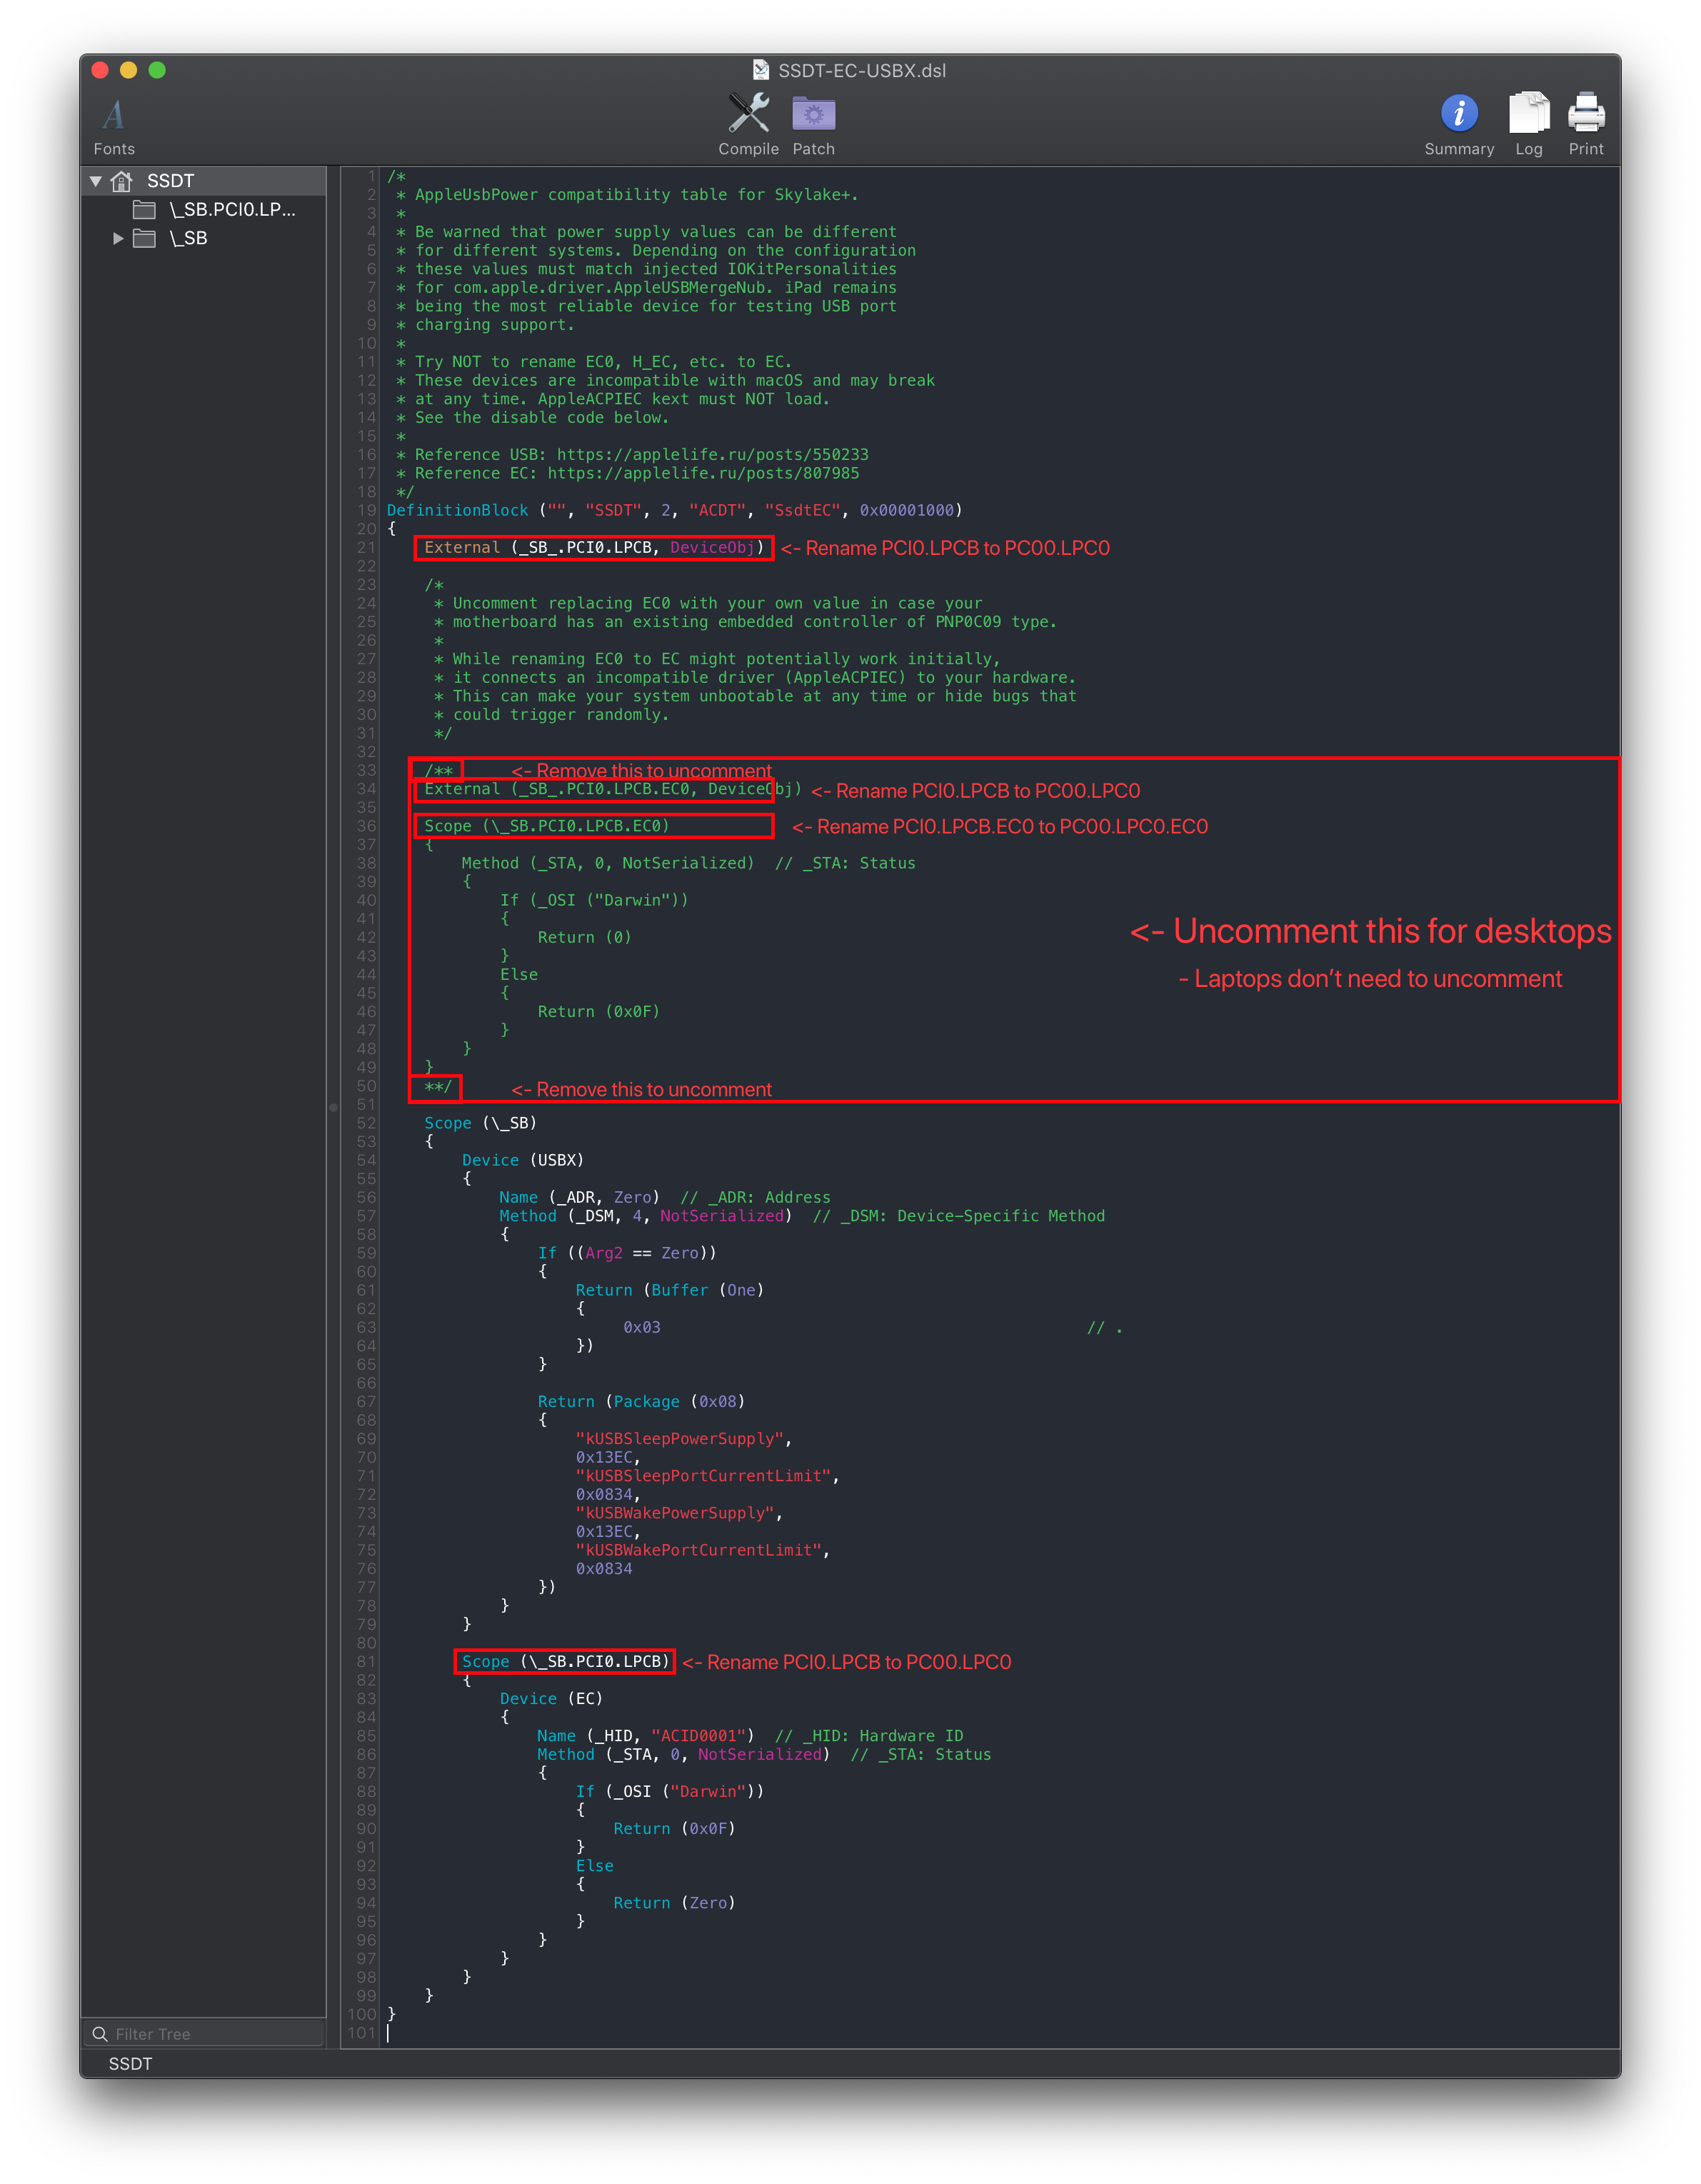
Now when opening this SSDT, you'll notice a few things. Mainly:
- Some code is commented out
- This is code for disabling our EC
- Laptops users SHOULD NOT uncomment this
- There's a new EC called
Device (EC)- DO NOT RENAME THIS, this will be the EC we give to macOS
External (_SB_.PCI0.LPCB, DeviceObj) <- Rename this

Scope (_SB.PCI0.LPCB) <- Rename this
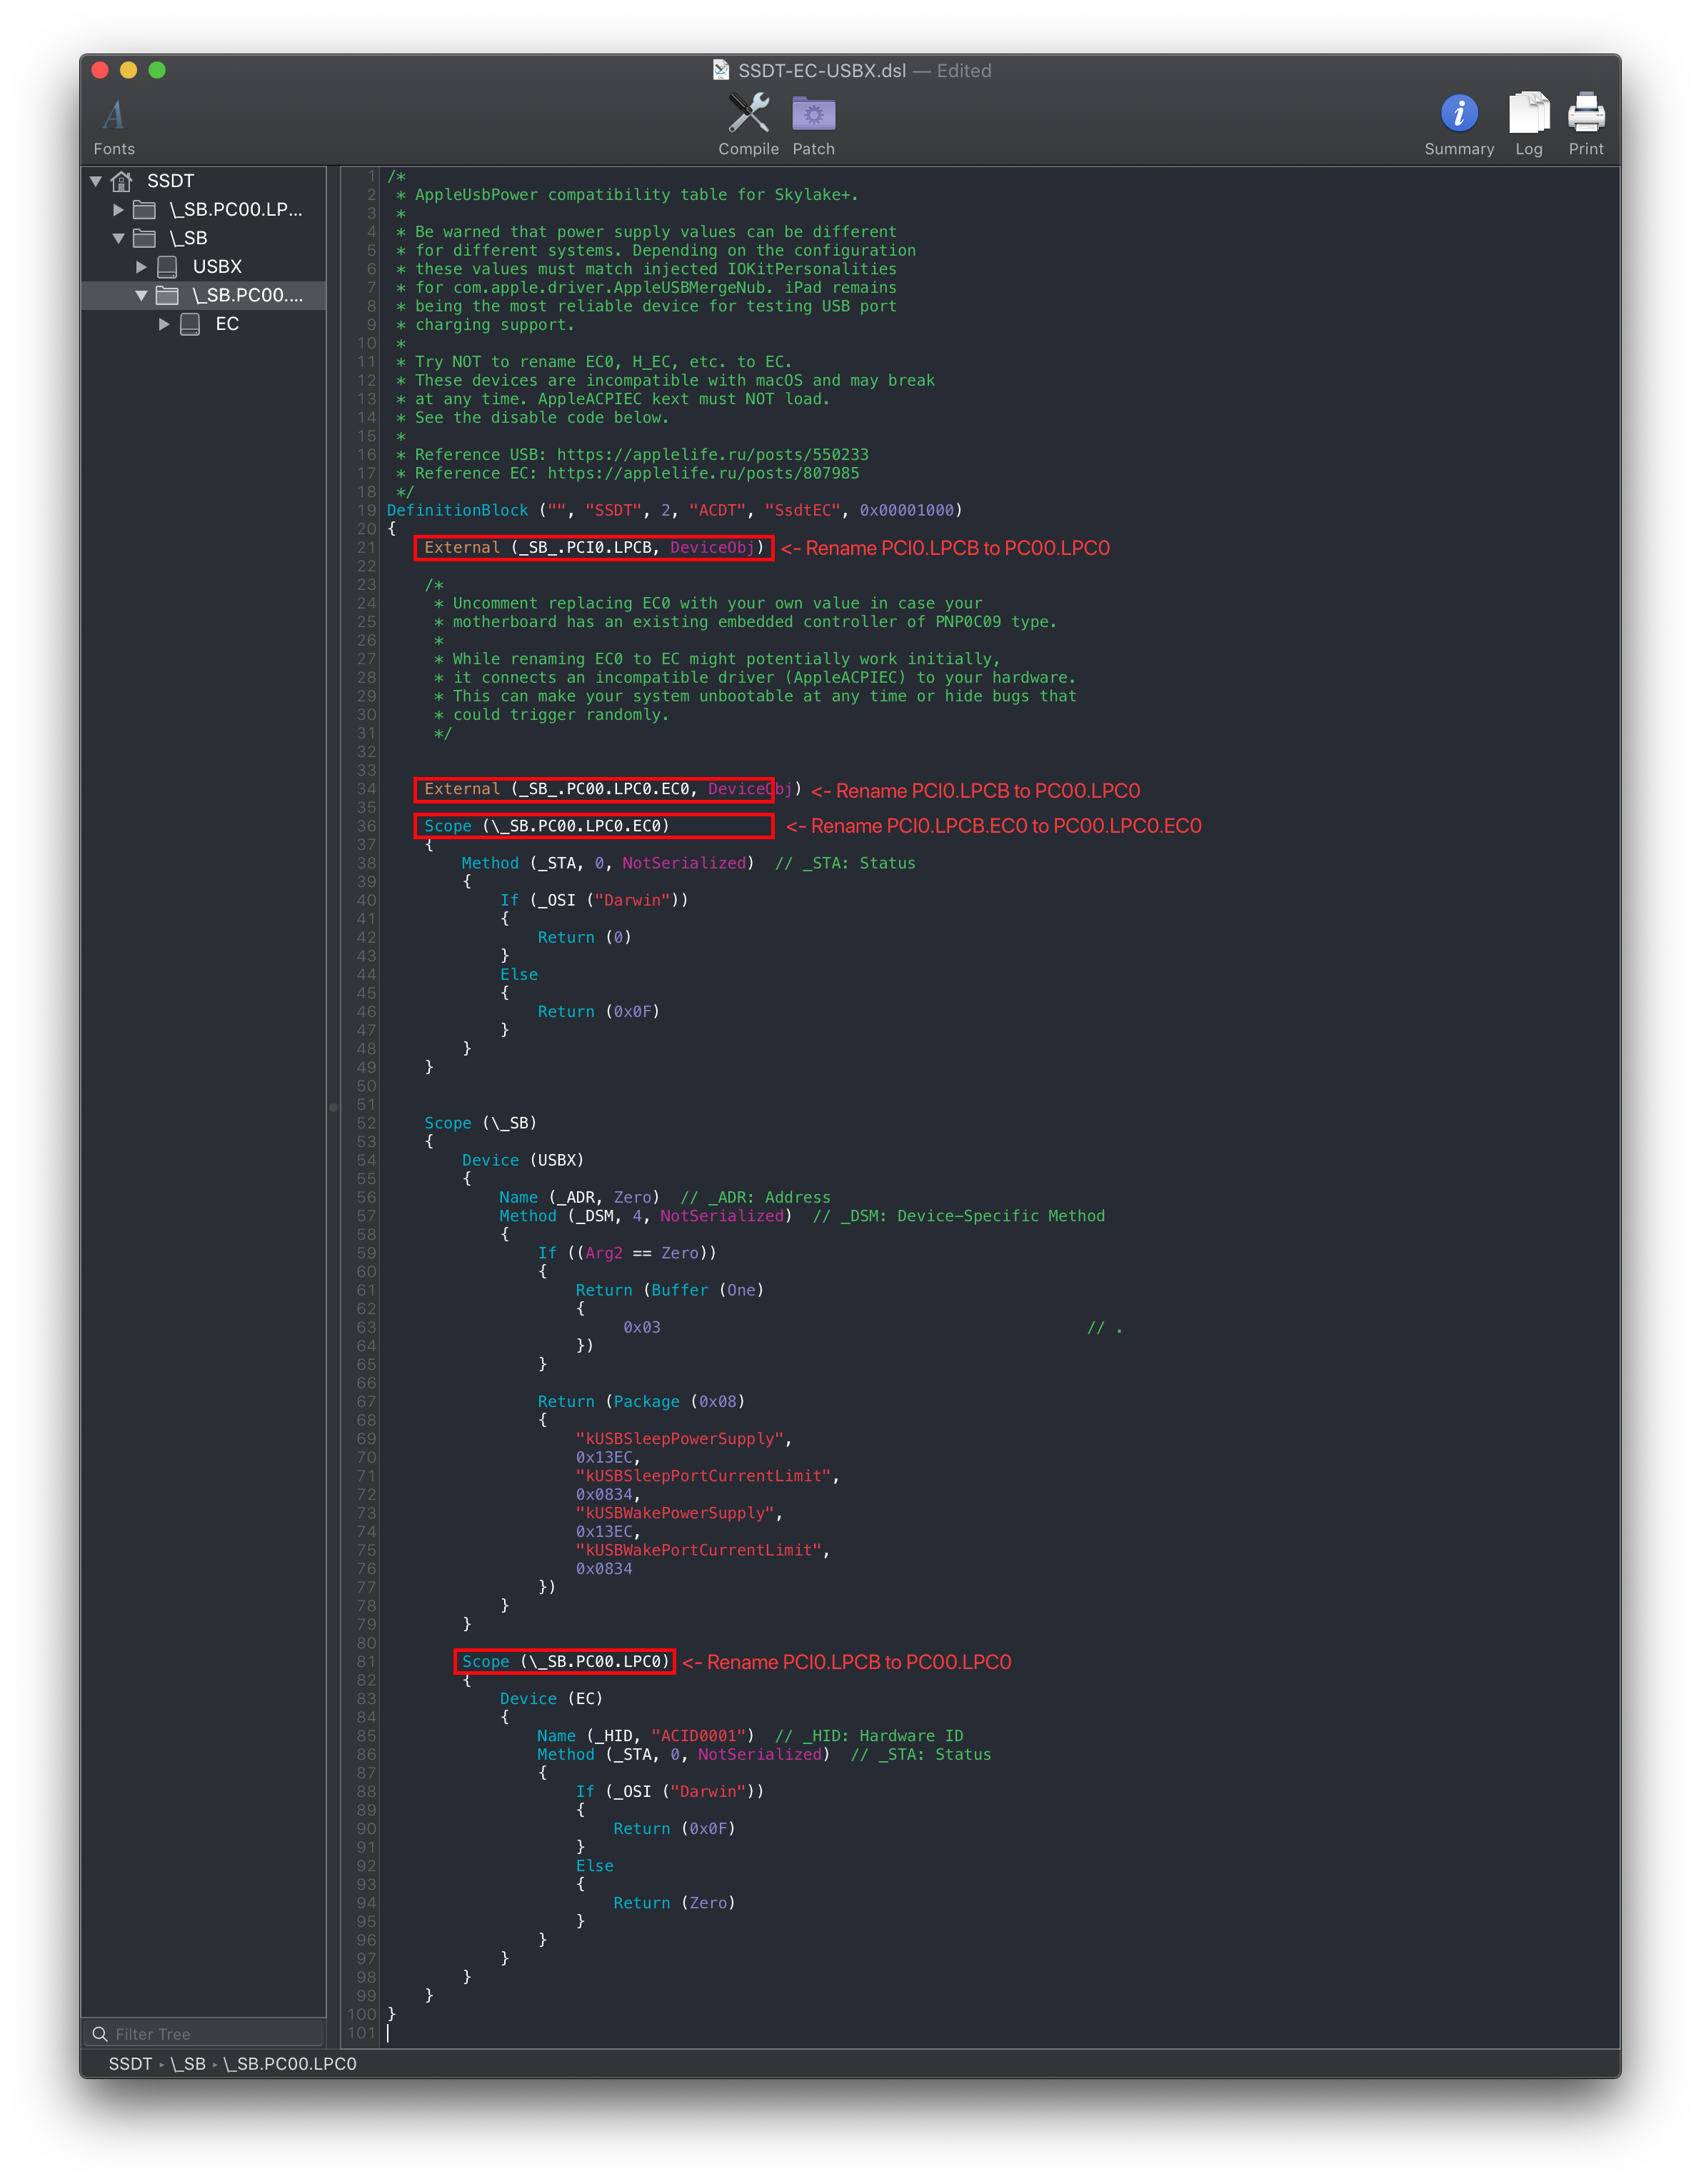
Following the example pathing we found, the SSDT should look something like this:
External (_SB_.PC00.LPC0, DeviceObj) <- Renamed

Scope (_SB.PC00.LPC0) <- Renamed
Edge Cases
Multiple PNP0C09's show up
When multiple PNP0C09 show up, we need to next check for the following properties:
_HID(Hardware ID)_CRS(Current Resource Settings)_GPE(General Purpose Events)
What these signify is whether this PNP0C09 device is real or not, as per the ACPI spec. So one's matching the above criteria are the one's we want to disable.
- Note: If _STA shows up as well, you'll need to go here: PNP0C09 already has an
_STAmethod
No PNP0C09 show up
When this happens, you'll only need to create a "dummy" EC for macOS.
Try searching for any devices named: "LPCB", "LPC0", "LPC", "SBRG", "PX40". If you have any of these, try using the LPC pathing of each of those device in place of the Embedded Controller's pathing.
Note that DO NOT uncomment the EC disabling code as there are no devices that are considered "EC" in your machine.
PNP0C09 already named EC
Congrats! No need to create an SSDT-EC! However you will still want USBX if you're Skylake or newer.
Prebuilt can be grabbed here: SSDT-USBX.aml
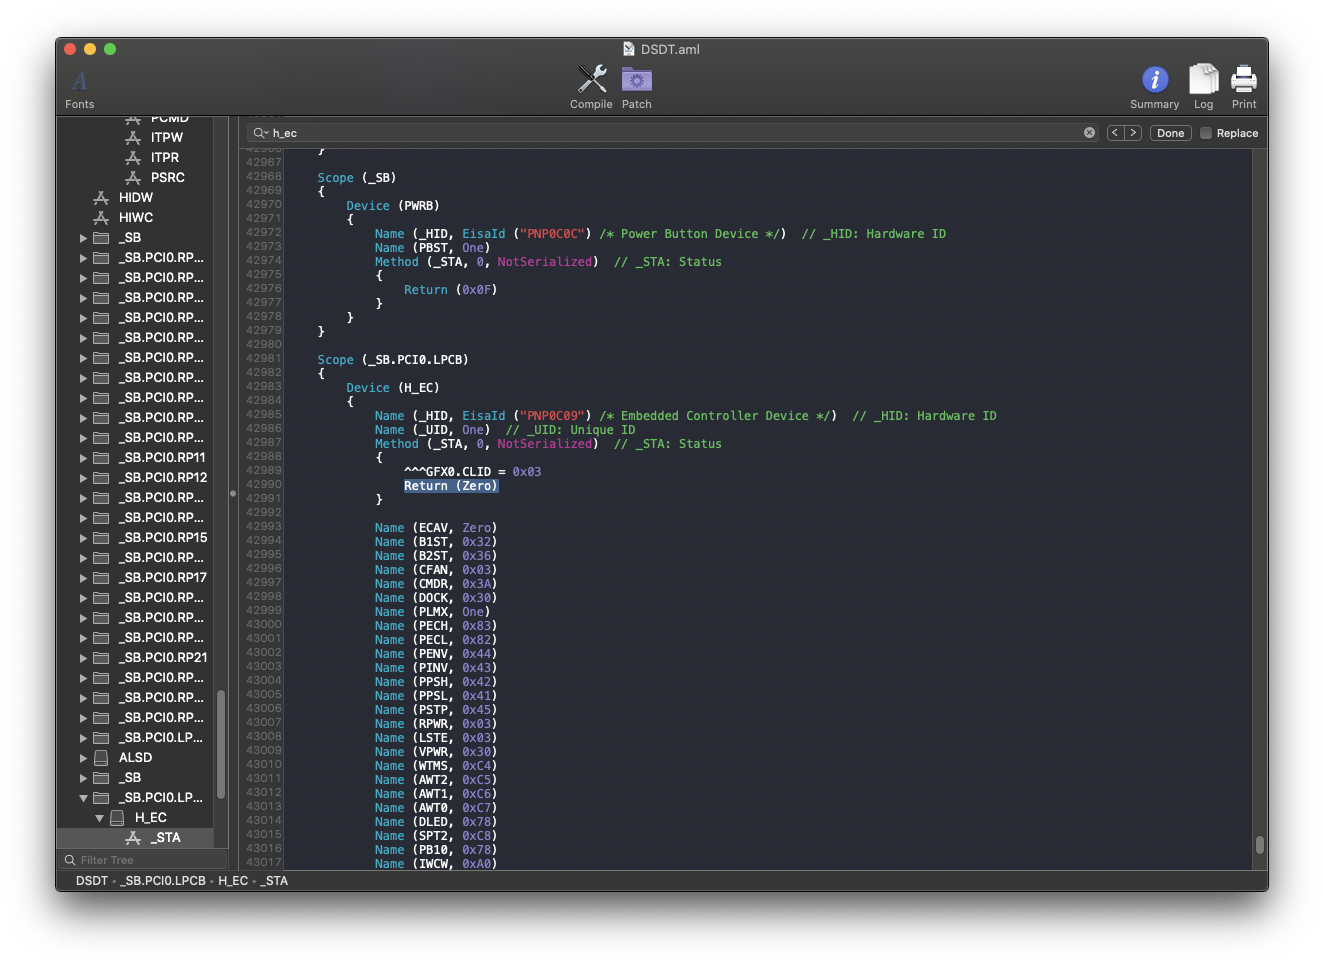
PNP0C09 already has an _STA method
This is the equivalent of not having an EC as we can't control it with our SSDT-EC, instead we'll need to create a "dummy" EC for macOS. You'll still want to find the PCI and LPC pathing for this device. So follow the guide as if you were creating a laptop SSDT-EC/USBX.
Example of an EC with STA already:
Compiling the SSDT
With the SSDT done, you're now ready to compile the SSDT!
Wrapping up
Once you're done making your SSDT, either head to the next page to finish the rest of the SSDTs or head here if you're ready to wrap up: